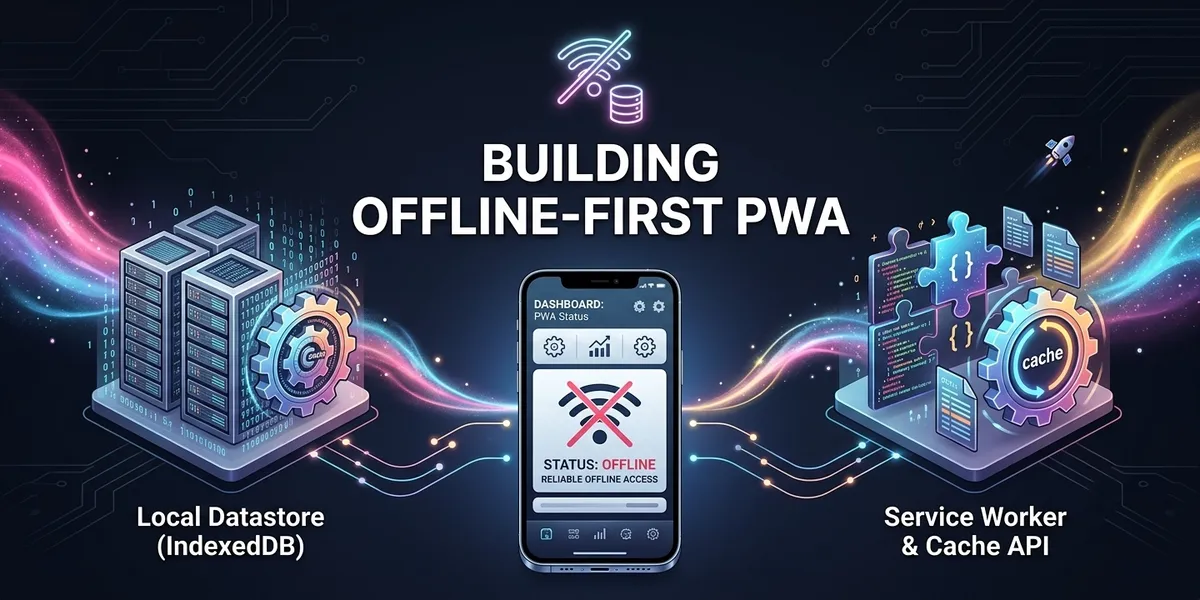
Modern web applications are expected to work reliably even when the network connection is slow, unstable, or completely unavailable.
This becomes particularly important for dashboards. A dashboard might display sales numbers, orders, reports, analytics, inventory, customer information, or operational data. If the application completely depends on the backend being reachable every time the page loads, users can end up staring at an empty screen whenever the network disappears.
A Progressive Web App, or PWA, gives us a way to make web applications more resilient.
In this article, we’ll build an offline-first React dashboard using:
- React
- TypeScript
- Vite
- Service Workers
- IndexedDB
- A REST API
- A Web App Manifest
The important part is that we will not use vite-plugin-pwa. Instead, we’ll configure the PWA pieces manually so that we understand exactly what is happening.
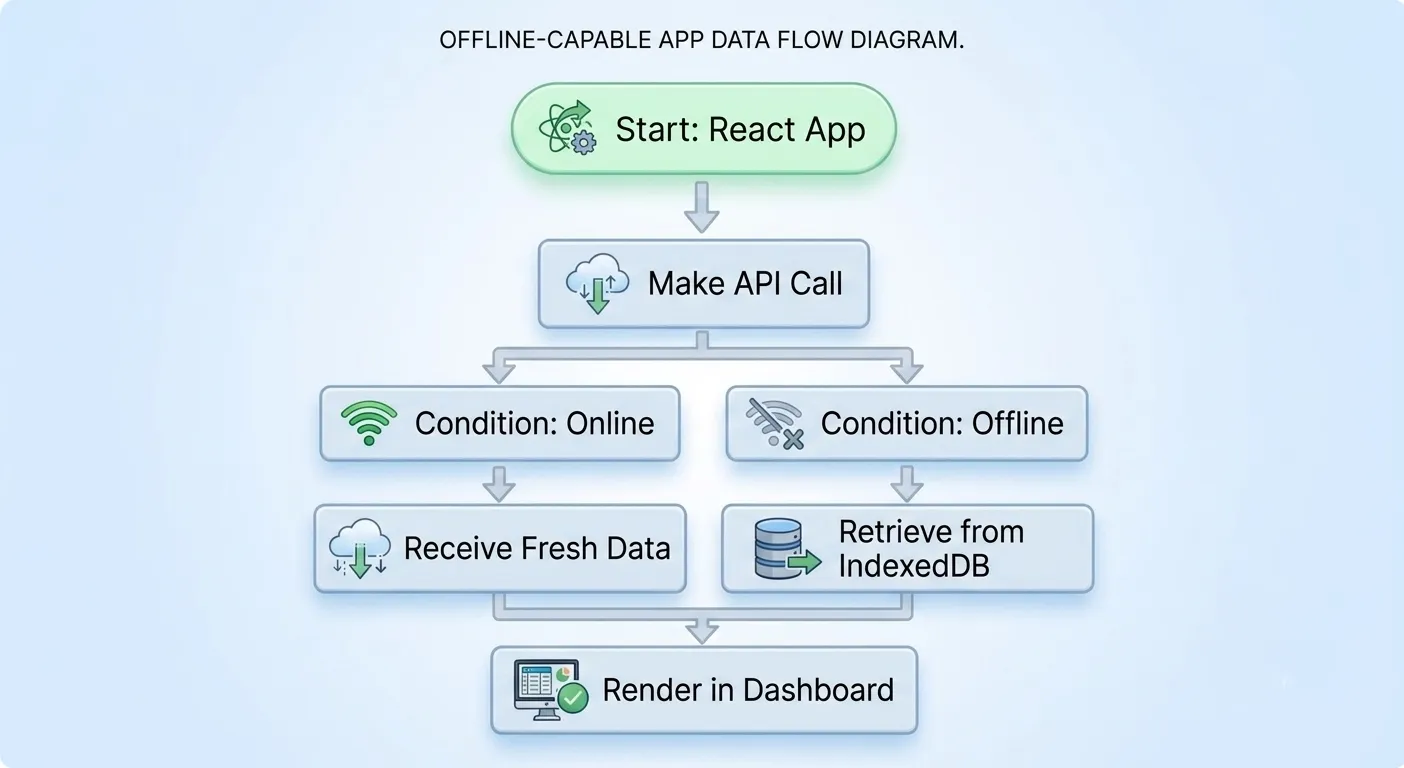
The final application will follow this basic behavior:
┌──────────────────┐
│ React App │
└────────┬─────────┘
│
▼
┌──────────────────┐
│ REST API │
└────────┬─────────┘
│
┌────────▼─────────┐
│ Fresh Data │
└────────┬─────────┘
│
▼
┌──────────────────┐
│ IndexedDB │
│ Local Database │
└──────────────────┘
If API is unavailable
│
▼
Read IndexedDB
│
▼
Show previous data
This gives users a much better experience when connectivity is unreliable.
What is a Progressive Web App?
A Progressive Web App is a web application that uses modern browser capabilities to provide an experience that is closer to a native application.
A typical PWA can provide features such as:
- Installability
- Offline support
- Background processing
- Local data storage
- App-like navigation
- Network resilience
- Home-screen installation
- Standalone display
A PWA does not require us to build a separate Android or iOS application just to provide these capabilities.
At its simplest, a PWA usually consists of a normal web application plus a web app manifest and, when needed, a service worker.
For an offline-first dashboard, the service worker and local storage strategy become particularly important.
Why use a PWA for a dashboard?
Imagine a dashboard used by a sales representative.
The representative opens the dashboard while connected to the internet and sees:
Orders: 1,248
Revenue: $84,250
Customers: 532
Pending: 27
They then enter an area with poor connectivity.
If the application always depends on the API, the next refresh could produce:
Unable to load dashboard
Network Error
That’s not a great user experience.
Instead, we can save the most recently retrieved data locally.
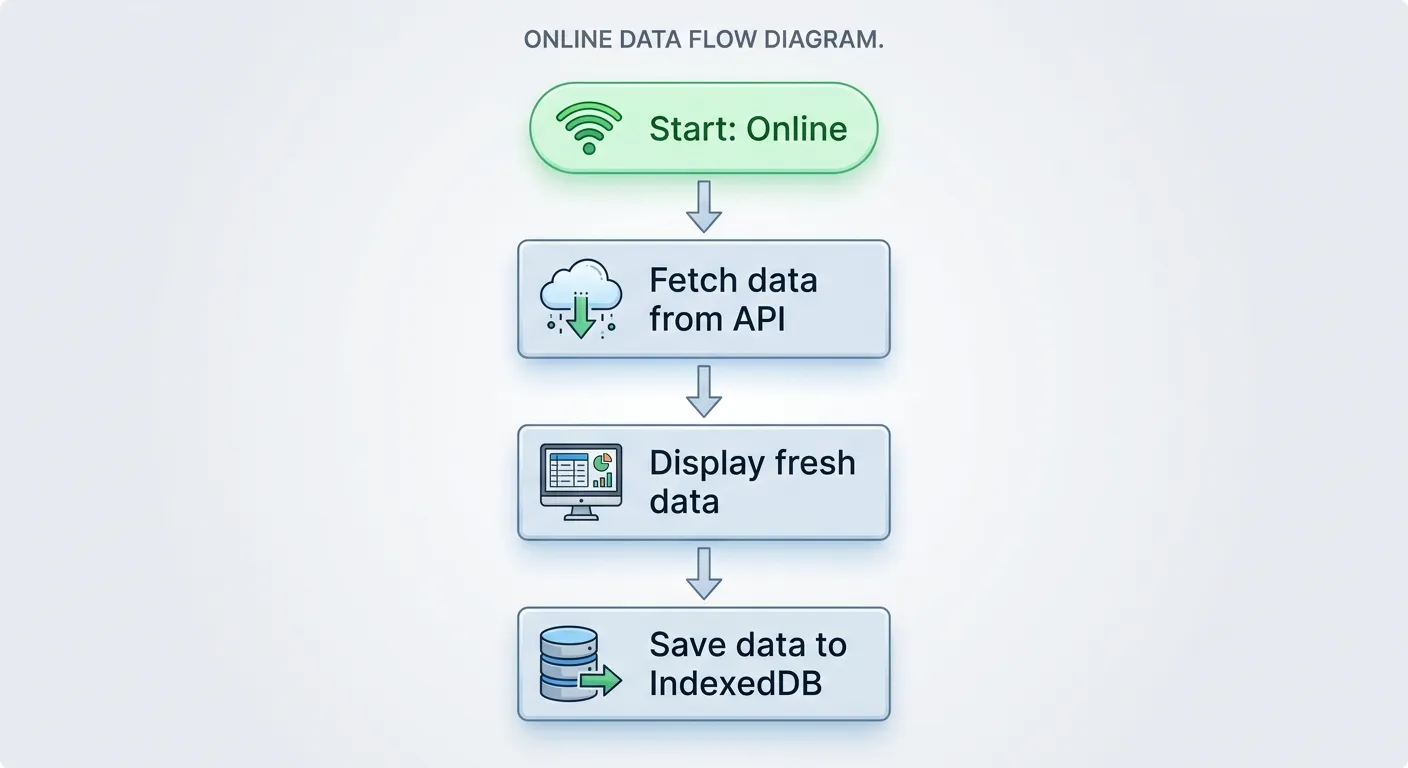
The next time the user opens the dashboard:
API available
│
▼
Fetch fresh data
│
▼
Save to IndexedDB
│
▼
Display fresh data
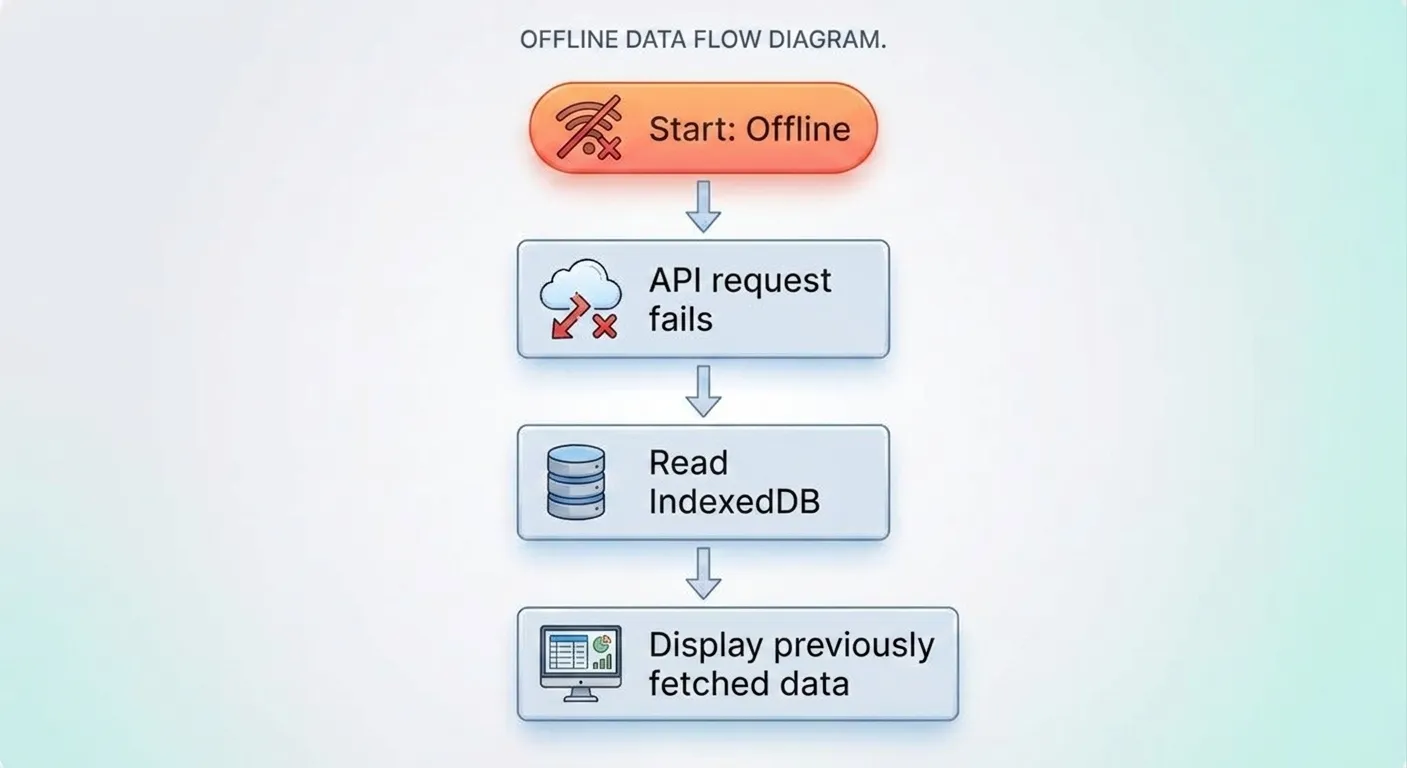
If the API isn’t available:
API unavailable
│
▼
Read IndexedDB
│
▼
Display previous data
The user can still see useful information instead of an empty application.
Our architecture
Our application will contain three important layers.
┌─────────────────────────────────────┐
│ React UI │
│ │
│ Dashboard / Loading / Error State │
└──────────────────┬──────────────────┘
│
▼
┌─────────────────────────────────────┐
│ API Layer │
│ │
│ Fetch data from backend │
└──────────────────┬──────────────────┘
│
┌────────┴─────────┐
│ │
▼ ▼
Online API IndexedDB
│ │
▼ ▼
Fresh data Cached data
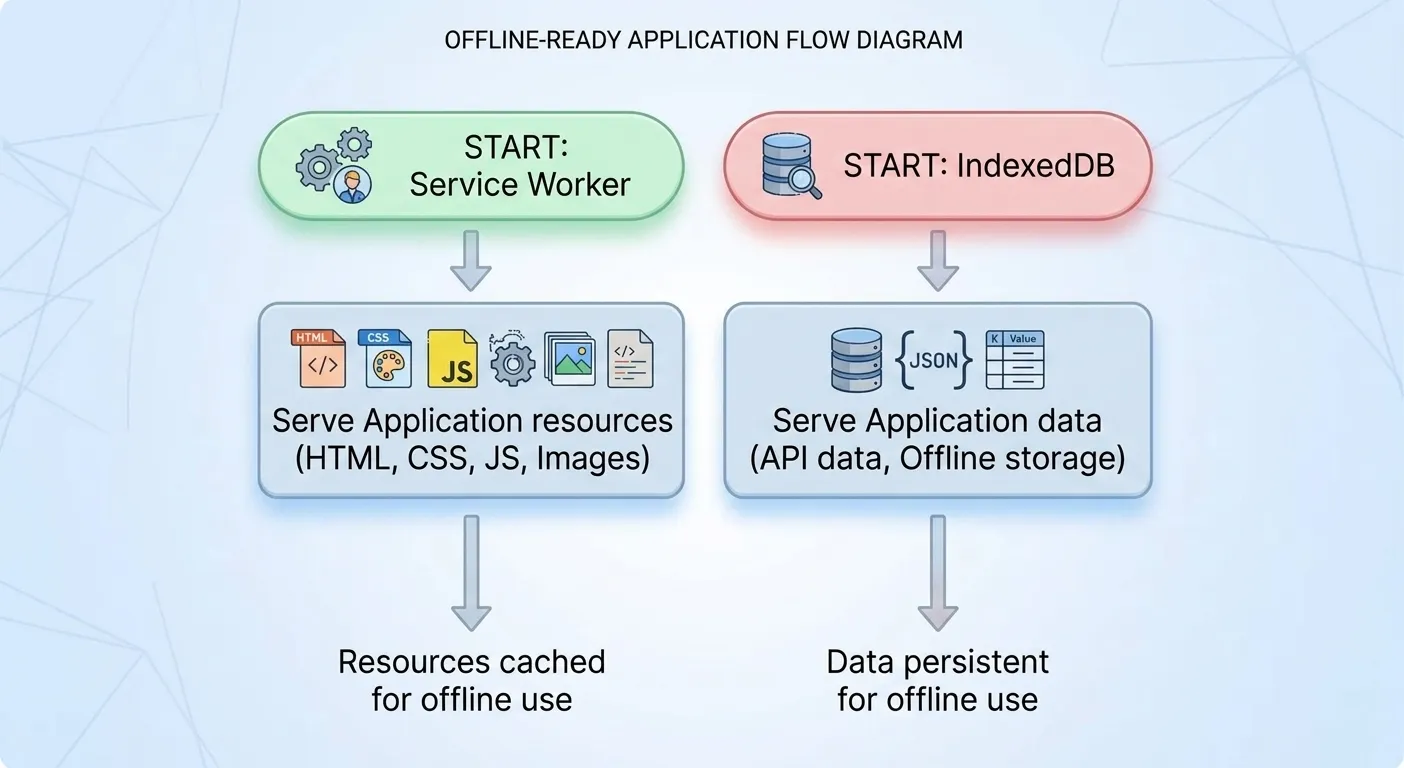
The service worker sits alongside this architecture and handles caching of application resources such as JavaScript, CSS, HTML, and other static assets.
IndexedDB, on the other hand, will be responsible for storing our application data.
This distinction is important.
Service Worker vs IndexedDB
These two technologies are related, but they solve different problems.
Service Worker
A service worker is a browser background script that can intercept network requests.
For example:
Browser
│
▼
Service Worker
│
├── Cache available → return cached resource
│
└── Cache unavailable → request from network
This makes service workers useful for caching application resources and enabling offline application loading.
IndexedDB
IndexedDB is a browser database.
It is better suited for structured application data:
IndexedDB
├── posts
├── users
├── orders
├── products
└── dashboardMetrics
For our example, we’ll use IndexedDB to store API responses.
A useful mental model is:
Service Worker
↓
"Can my application resources load?"
IndexedDB
↓
"Can my application data still be displayed?"
Both are useful for a complete offline-first application.
Creating the React application
We’ll use Vite to create the project.
Run:
npm create vite@latest dashboard-pwa -- --template react-ts
Then move into the project:
cd dashboard-pwa
Install dependencies:
npm install
Start the development server:
npm run dev
The project structure will initially look something like this:
dashboard-pwa/
├── public/
├── src/
│ ├── App.tsx
│ ├── main.tsx
│ └── ...
├── index.html
├── package.json
├── tsconfig.json
└── vite.config.ts
We’ll add our PWA-related files manually.
API layer
For the example, we’ll use JSONPlaceholder as a simple REST API.
Create:
src/api.ts
Add:
export interface Post {
userId: number;
id: number;
title: string;
body: string;
}
export async function fetchPosts(): Promise<Post[]> {
const response = await fetch("https://jsonplaceholder.typicode.com/posts");
if (!response.ok) {
throw new Error("Failed to fetch posts");
}
return response.json();
}
The Post interface gives TypeScript information about the API response.
Our application now has a dedicated API function:
React
│
▼
fetchPosts()
│
▼
REST API
│
▼
Post[]
Keeping API calls separate from UI components becomes especially useful as the application grows.
Creating an IndexedDB database
Now we need a place to store the previously fetched data.
Create:
src/db.ts
Add:
import type { Post } from "./api";
const DB_NAME = "dashboard-db";
const STORE_NAME = "posts";
const DB_VERSION = 1;
function openDB(): Promise<IDBDatabase> {
return new Promise((resolve, reject) => {
const request = indexedDB.open(DB_NAME, DB_VERSION);
request.onupgradeneeded = () => {
const db = request.result;
if (!db.objectStoreNames.contains(STORE_NAME)) {
db.createObjectStore(STORE_NAME, {
keyPath: "id",
});
}
};
request.onsuccess = () => {
resolve(request.result);
};
request.onerror = () => {
reject(request.error);
};
});
}
export async function savePosts(posts: Post[]): Promise<void> {
const db = await openDB();
return new Promise((resolve, reject) => {
const transaction = db.transaction(STORE_NAME, "readwrite");
const store = transaction.objectStore(STORE_NAME);
posts.forEach((post) => {
store.put(post);
});
transaction.oncomplete = () => {
resolve();
};
transaction.onerror = () => {
reject(transaction.error);
};
});
}
export async function getCachedPosts(): Promise<Post[]> {
const db = await openDB();
return new Promise((resolve, reject) => {
const transaction = db.transaction(STORE_NAME, "readonly");
const store = transaction.objectStore(STORE_NAME);
const request = store.getAll();
request.onsuccess = () => {
resolve(request.result);
};
request.onerror = () => {
reject(request.error);
};
});
}
Now we have three important functions:
openDB()
↓
Open or create database
savePosts()
↓
Store API data locally
getCachedPosts()
↓
Retrieve previously stored data
Why IndexedDB instead of localStorage?
You might wonder why we don’t simply use localStorage.
For very small pieces of data, localStorage is perfectly useful.
For example:
localStorage.setItem("theme", "dark");
But dashboard data can become much larger and more structured.
IndexedDB provides:
- Structured data storage
- Larger storage capacity
- Object stores
- Indexed queries
- Asynchronous APIs
- Better support for larger application datasets
For an offline-first dashboard, IndexedDB is generally a better foundation.
Building the dashboard
Now let’s connect the API and IndexedDB layers to React.
Replace the contents of:
src/App.tsx
with:
import { useEffect, useState } from "react";
import { fetchPosts, type Post } from "./api";
import { getCachedPosts, savePosts } from "./db";
import "./App.css";
function App() {
const [posts, setPosts] = useState<Post[]>([]);
const [loading, setLoading] = useState(true);
const [isOffline, setIsOffline] = useState(!navigator.onLine);
const [dataSource, setDataSource] = useState<"network" | "cache" | null>(
null,
);
useEffect(() => {
async function loadData() {
try {
setLoading(true);
const freshPosts = await fetchPosts();
setPosts(freshPosts);
setDataSource("network");
await savePosts(freshPosts);
} catch (error) {
console.error("Network request failed:", error);
try {
const cachedPosts = await getCachedPosts();
setPosts(cachedPosts);
setDataSource("cache");
} catch (cacheError) {
console.error("Unable to load cached data:", cacheError);
}
} finally {
setLoading(false);
}
}
loadData();
const handleOnline = () => {
setIsOffline(false);
};
const handleOffline = () => {
setIsOffline(true);
};
window.addEventListener("online", handleOnline);
window.addEventListener("offline", handleOffline);
return () => {
window.removeEventListener("online", handleOnline);
window.removeEventListener("offline", handleOffline);
};
}, []);
if (loading) {
return <div className="loading">Loading dashboard...</div>;
}
return (
<main className="dashboard">
<header className="header">
<div>
<h1>Dashboard</h1>
<p>{isOffline ? "You are currently offline" : "You are online"}</p>
</div>
{dataSource && <span className="source">Source: {dataSource}</span>}
</header>
{posts.length === 0 ? (
<div className="empty">No cached data is available.</div>
) : (
<section className="grid">
{posts.slice(0, 12).map((post) => (
<article className="card" key={post.id}>
<h2>{post.title}</h2>
<p>{post.body}</p>
</article>
))}
</section>
)}
</main>
);
}
export default App;
The important part is this:
try {
const freshPosts = await fetchPosts();
setPosts(freshPosts);
setDataSource("network");
await savePosts(freshPosts);
} catch {
const cachedPosts = await getCachedPosts();
setPosts(cachedPosts);
setDataSource("cache");
}
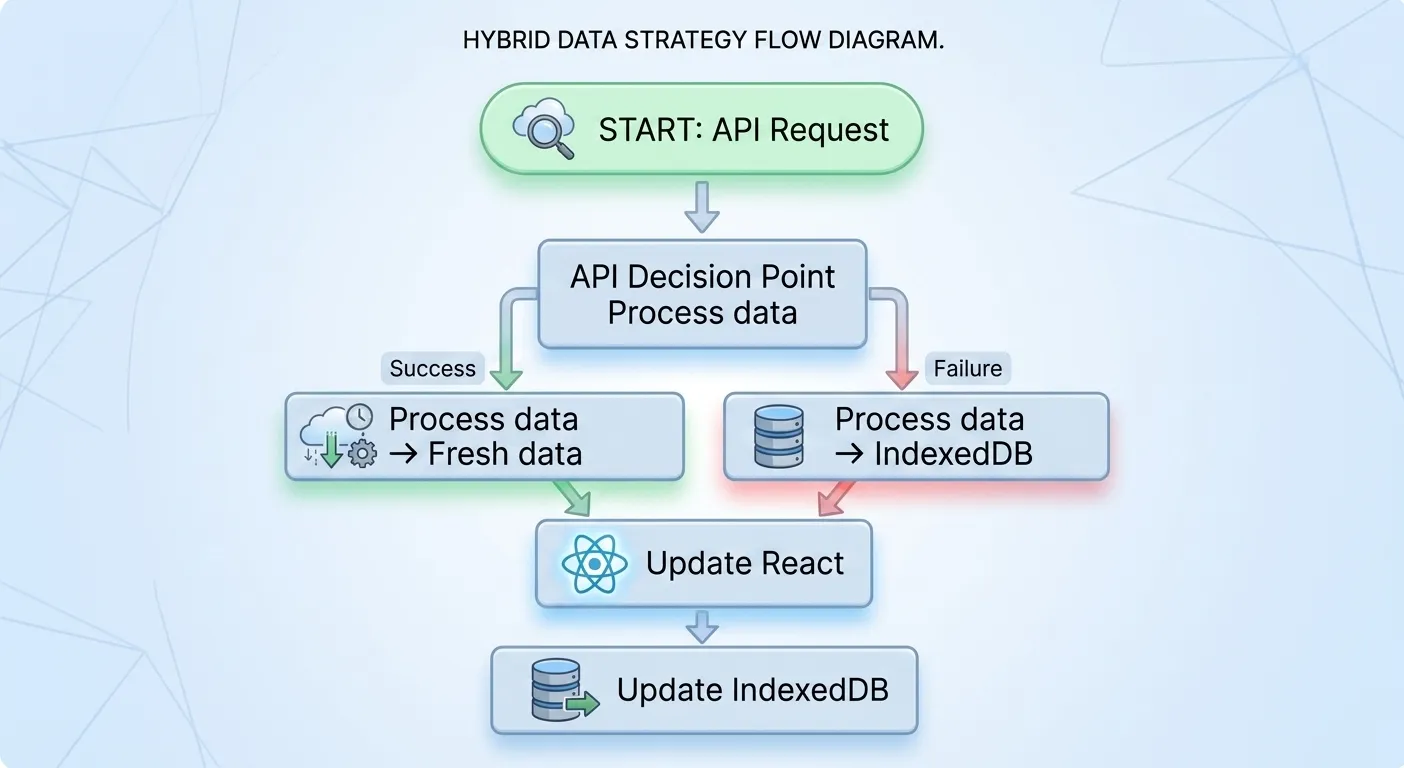
The application first attempts to retrieve fresh data.
If that succeeds:
API
↓
Fresh data
↓
React
↓
IndexedDB
If the request fails:
API
↓
Request fails
↓
IndexedDB
↓
Previously cached data
↓
React
This is the core of our offline-first strategy.
Styling the dashboard
Create or replace:
src/App.css
with:
* {
box-sizing: border-box;
}
body {
margin: 0;
font-family:
Inter,
system-ui,
-apple-system,
BlinkMacSystemFont,
"Segoe UI",
sans-serif;
background: #f5f7fb;
color: #1f2937;
}
.dashboard {
max-width: 1200px;
margin: 0 auto;
padding: 32px 20px;
}
.header {
display: flex;
justify-content: space-between;
align-items: center;
gap: 20px;
margin-bottom: 32px;
}
.header h1 {
margin: 0 0 8px;
font-size: 32px;
}
.header p {
margin: 0;
color: #6b7280;
}
.source {
padding: 8px 12px;
border-radius: 999px;
background: #e5e7eb;
font-size: 14px;
}
.grid {
display: grid;
grid-template-columns: repeat(auto-fit, minmax(260px, 1fr));
gap: 20px;
}
.card {
padding: 20px;
border-radius: 12px;
background: white;
box-shadow: 0 4px 16px rgba(0, 0, 0, 0.06);
}
.card h2 {
margin-top: 0;
font-size: 18px;
}
.card p {
line-height: 1.6;
color: #4b5563;
}
.loading,
.empty {
padding: 40px;
text-align: center;
}
Now we have a basic dashboard UI.
Creating the Service Worker
Next comes the PWA-specific part.
Create:
public/sw.js
Add:
const CACHE_NAME = "dashboard-pwa-v1";
const APP_SHELL = ["/", "/index.html"];
self.addEventListener("install", (event) => {
event.waitUntil(
caches.open(CACHE_NAME).then((cache) => {
return cache.addAll(APP_SHELL);
}),
);
self.skipWaiting();
});
self.addEventListener("activate", (event) => {
event.waitUntil(
caches.keys().then((cacheNames) => {
return Promise.all(
cacheNames
.filter((name) => name !== CACHE_NAME)
.map((name) => caches.delete(name)),
);
}),
);
self.clients.claim();
});
self.addEventListener("fetch", (event) => {
if (event.request.method !== "GET") {
return;
}
event.respondWith(
fetch(event.request)
.then((response) => {
const responseClone = response.clone();
caches.open(CACHE_NAME).then((cache) => {
cache.put(event.request, responseClone);
});
return response;
})
.catch(() => {
return caches.match(event.request);
}),
);
});
This service worker implements a basic network-first strategy.
The flow is:
Request
│
▼
Try network
│
├── Success ──► Return network response
│ │
│ ▼
│ Save cache
│
└── Failure ──► Check cache
│
▼
Cached response
This is useful for application resources.
However, we should not confuse this with our IndexedDB data strategy.
Our service worker caches network resources.
Our IndexedDB layer caches dashboard data.
Registering the Service Worker
Now we need to register it.
Open:
src/main.tsx
Use:
import React from "react";
import ReactDOM from "react-dom/client";
import App from "./App";
import "./index.css";
ReactDOM.createRoot(document.getElementById("root")!).render(
<React.StrictMode>
<App />
</React.StrictMode>,
);
if ("serviceWorker" in navigator) {
window.addEventListener("load", () => {
navigator.serviceWorker
.register("/sw.js")
.then((registration) => {
console.log("Service Worker registered:", registration.scope);
})
.catch((error) => {
console.error("Service Worker registration failed:", error);
});
});
}
We deliberately register the service worker ourselves.
There is no:
vite-plugin-pwa
in this project.
That makes the example slightly more manual, but it also makes the underlying PWA architecture easier to understand.
Adding the Web App Manifest
A PWA should also have a web app manifest.
Create:
public/manifest.json
Add:
{
"name": "Offline Dashboard",
"short_name": "Dashboard",
"description": "An offline-first React dashboard",
"start_url": "/",
"display": "standalone",
"background_color": "#ffffff",
"theme_color": "#111827",
"icons": [
{
"src": "/icons/icon-192.png",
"sizes": "192x192",
"type": "image/png"
},
{
"src": "/icons/icon-512.png",
"sizes": "512x512",
"type": "image/png"
}
]
}
The manifest tells the browser how the application should behave when installed.
For example:
{
"name": "Offline Dashboard",
"short_name": "Dashboard",
"display": "standalone"
}
means the installed application can have a more app-like appearance instead of looking exactly like a normal browser tab.
You will also need to place the corresponding icon files at:
public/icons/icon-192.png
public/icons/icon-512.png
Connecting the manifest
Open:
index.html
Inside the <head> element, add:
<link rel="manifest" href="/manifest.json" />
<meta name="theme-color" content="#111827" />
A simplified index.html might look like:
<!doctype html>
<html lang="en">
<head>
<meta charset="UTF-8" />
<meta name="viewport" content="width=device-width, initial-scale=1.0" />
<meta name="theme-color" content="#111827" />
<link rel="manifest" href="/manifest.json" />
<title>Offline Dashboard</title>
</head>
<body>
<div id="root"></div>
<script type="module" src="/src/main.tsx"></script>
</body>
</html>
What happens when the application starts?
We can now trace the complete application lifecycle.
First visit
The user opens the application while online.
Browser
│
▼
React Application
│
▼
Fetch API
│
▼
Fresh data
│
├──────────────► React UI
│
└──────────────► IndexedDB
At the same time, the service worker is installed and begins handling cacheable application requests.
Second visit while online
The application requests fresh data again.
API
↓
Fresh data
↓
React
↓
Update IndexedDB
The local cache is refreshed.
Visit while offline
Now suppose the user has no internet connection.
React
│
▼
API request
│
X
Network unavailable
│
▼
IndexedDB
│
▼
Previous data
│
▼
React UI
The user can still access previously loaded information.
This is the most important feature of our example.
Network-first vs cache-first
There are several caching strategies that can be used in PWAs.
Two common approaches are network-first and cache-first.
Network-first
Network-first means:
Try network
│
├── Success → use network
│
└── Failure → use cache
This is useful when fresh data is important.
For a dashboard, this is often a good starting point because users generally want the newest information whenever the network is available.
Cache-first
Cache-first means:
Check cache
│
├── Found → use cache
│
└── Missing → request network
This is useful for resources that don’t change frequently.
For example:
- Fonts
- Static images
- CSS
- JavaScript bundles
- Static configuration
The correct strategy depends on the type of resource.
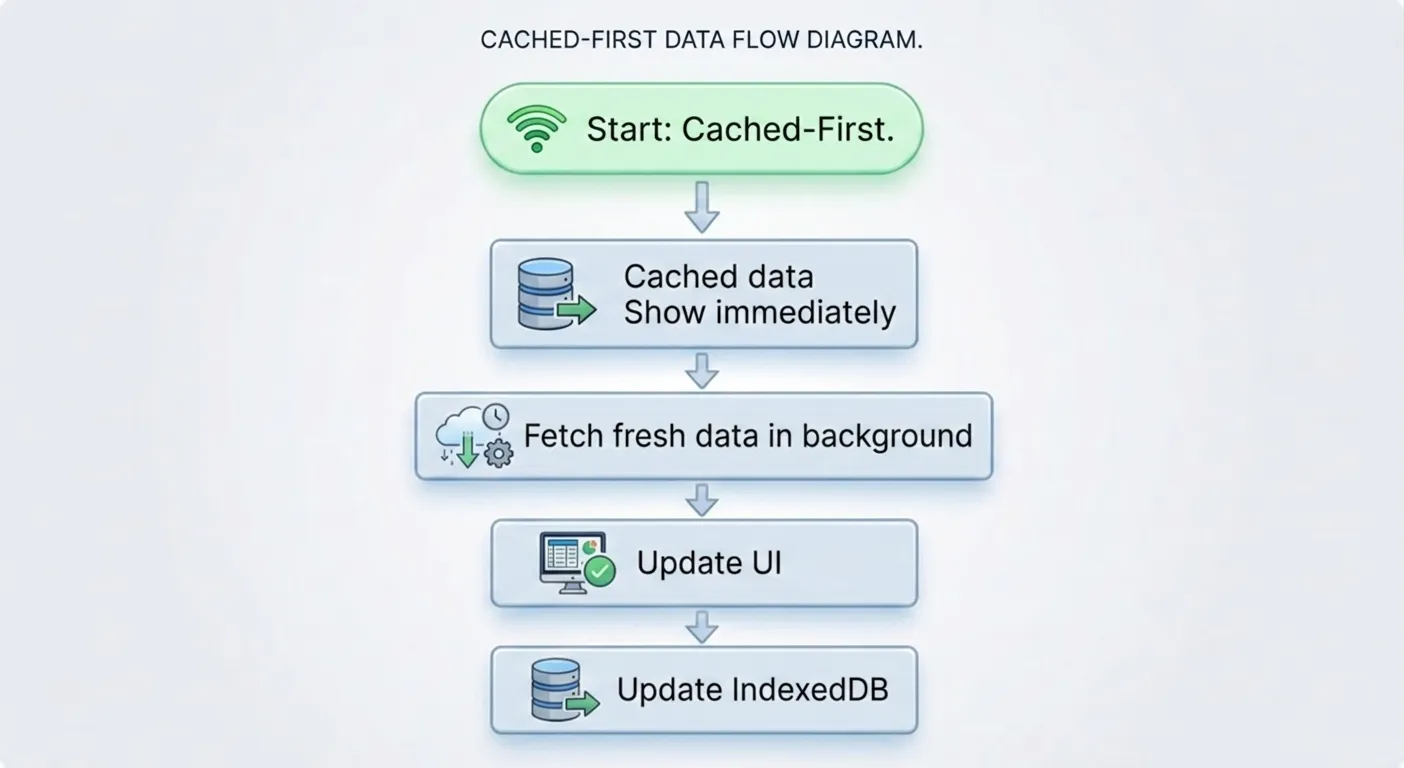
Improving the dashboard with stale-while-revalidate
The simple example above waits for the API request before rendering.
A production dashboard can provide an even better experience with stale-while-revalidate.
The idea is:
┌───────────────┐
│ Cached Data │
└───────┬───────┘
│
▼
Show immediately
│
▼
Fetch fresh data
│
▼
Update the UI
│
▼
Update cache
The user immediately sees the previous dashboard state.
Meanwhile, the application checks whether newer data is available.
If the request succeeds, the UI updates.
This is particularly useful for dashboards because a slightly old dashboard is often much more useful than a blank loading screen.
Example stale-while-revalidate flow
Imagine the cached data says:
Revenue: $82,400
The user opens the dashboard.
The cached value appears immediately:
Revenue: $82,400
Refreshing...
The API returns:
Revenue: $84,250
The application updates:
Revenue: $84,250
The new result is then stored locally.
This creates a much smoother experience.
Using a real dashboard API
In a production application, JSONPlaceholder would be replaced by your backend.
For example:
export interface DashboardData {
totalOrders: number;
revenue: number;
customers: number;
pendingOrders: number;
}
export async function fetchDashboard(): Promise<DashboardData> {
const response = await fetch("/api/dashboard");
if (!response.ok) {
throw new Error("Unable to fetch dashboard data");
}
return response.json();
}
The same offline strategy can then be applied:
Backend API
│
▼
Dashboard JSON
│
├──────────────► React
│
└──────────────► IndexedDB
If the backend is unavailable:
Backend unavailable
│
▼
IndexedDB
│
▼
Previous dashboard data
Authentication considerations
Real dashboards usually require authentication.
For example:
Login
↓
Access Token
↓
Dashboard API
When implementing offline support, authentication requires additional consideration.
You should avoid blindly caching sensitive API responses.
Consider:
- What data is safe to store locally?
- How long should cached data remain available?
- What happens when the user’s session expires?
- Should cached data be encrypted or otherwise protected?
- Should cached data be removed after logout?
- Can another user access the same browser profile?
For example, when a user logs out, the application might clear user-specific IndexedDB data:
Logout
│
├── Clear authentication state
│
└── Delete user-specific cached data
Offline support should therefore be designed together with your application’s security model.
What about offline writes?
So far, our example only reads data.
That’s much easier.
Consider a dashboard where users can create an order while offline.
Now the problem changes.
Suppose the user submits:
Create Order #1024
while offline.
The application cannot immediately send it to the backend.
Instead, it might store the operation locally:
IndexedDB
Pending Operations
────────────────────────
CREATE_ORDER #1024
CREATE_ORDER #1025
UPDATE_ORDER #998
When connectivity returns:
Internet restored
│
▼
Read pending operations
│
▼
Send to backend
│
▼
Confirm success
│
▼
Remove from local queue
This pattern is often called an offline mutation queue.
It is considerably more complex because you need to think about:
- Duplicate requests
- Retry behavior
- Conflicts
- Ordering
- Server validation
- Authentication expiration
- Failed mutations
- Idempotency
For a first offline-first application, read-only cached data is a much simpler place to start.
Testing the PWA
Don’t rely only on the development server.
Build the application:
npm run build
Then preview it:
npm run preview
Open the URL provided by Vite.
Now open the browser’s developer tools.
Look for the Application section.
You should be able to inspect:
Application
├── Manifest
├── Service Workers
├── Cache Storage
└── IndexedDB
Testing the service worker
Under:
Application → Service Workers
you should see the registered service worker.
You can inspect:
- Registration
- Status
- Scope
- Updates
- Unregister controls
Testing IndexedDB
Navigate to:
Application
↓
IndexedDB
↓
dashboard-db
↓
posts
You should see the previously fetched posts.
This is a useful way to confirm that the API data is actually being persisted.
Testing offline mode
Open DevTools.
Go to the Network tab.
Enable:
Offline
Then reload the application.
The network request should fail.
Our React application should then execute:
const cachedPosts = await getCachedPosts();
and display the previously stored data.
The UI should indicate:
You are currently offline
Source: cache
This is the key behavior we’re trying to achieve.
HTTPS matters
Service workers have security requirements.
In production, your application should be served over HTTPS.
During local development, browsers generally allow secure-context development through localhost.
For production deployments, use HTTPS:
https://example.com
rather than:
http://example.com
This is important not only for service workers but also for the security of the application as a whole.
Common mistakes
There are several mistakes developers commonly make when implementing offline support.
Mistake 1: Only caching the HTML
Caching the HTML doesn’t automatically mean your application data is available offline.
You need to think about two different things:
Application resources
+
Application data
Our example handles these separately.
Service Worker
↓
Application resources
IndexedDB
↓
Dashboard data
Mistake 2: Treating the service worker as a database
A service worker isn’t a replacement for IndexedDB.
The service worker manages network interception and caching behavior.
IndexedDB provides persistent structured storage.
Mistake 3: Showing an empty dashboard offline
A common implementation is:
try {
const data = await fetchData();
setData(data);
} catch {
setData([]);
}
This technically handles an error, but destroys the user experience.
A better approach is:
try {
const data = await fetchData();
setData(data);
await saveData(data);
} catch {
const cached = await getCachedData();
setData(cached);
}
Now the user still gets useful information.
Mistake 4: Never indicating stale data
Offline data isn’t necessarily current.
Users should understand that they are viewing previously cached information.
For example:
Offline
Showing data from your last successful sync.
Or:
Last updated:
September 5, 2026 at 11:42 AM
This is especially important for business-critical dashboards.
Adding a last-updated timestamp
We can make our cache more useful by storing metadata alongside the data.
Instead of simply saving:
posts
we can store:
{
data: [...],
updatedAt: "2026-09-05T11:42:00.000Z"
}
Then the UI can display:
Last updated 12 minutes ago
This small addition can significantly improve the offline experience because users know how old their data is.
PWA advantages
An offline-first PWA provides several benefits.
Better reliability
The application can continue working when the network is unavailable.
Better user experience
Users don’t immediately see a network error when connectivity disappears.
Installability
Users can install the application on supported platforms.
Lower development cost
The same React application can serve as both a website and an installable application.
Local data access
IndexedDB makes it possible to persist structured application data.
Network resilience
Service workers allow us to control how resources behave when connectivity changes.
Progressive enhancement
Users without advanced PWA support can still use the normal web application.
PWA limitations
PWAs aren’t a replacement for native applications in every scenario.
Depending on the platform and browser, capabilities can vary.
You may also need additional architecture for:
- Complex background synchronization
- Advanced device integrations
- Heavy offline workflows
- Large local datasets
- Complex offline writes
- Background processing
- Push notifications
- Native hardware integrations
For many business dashboards, internal tools, admin applications, reporting applications, and field applications, however, PWAs can be an excellent solution.
Final project structure
Our final project looks like this:
dashboard-pwa/
│
├── public/
│ ├── icons/
│ │ ├── icon-192.png
│ │ └── icon-512.png
│ │
│ ├── manifest.json
│ └── sw.js
│
├── src/
│ ├── api.ts
│ ├── db.ts
│ ├── App.tsx
│ ├── App.css
│ └── main.tsx
│
├── index.html
├── package.json
├── tsconfig.json
└── vite.config.ts
The responsibilities are intentionally separated:
api.ts
↓
Backend communication
db.ts
↓
Local persistence
App.tsx
↓
Application state + UI
sw.js
↓
Network/resource caching
manifest.json
↓
PWA metadata
main.tsx
↓
React bootstrap + service worker registration
The complete offline-first flow
Putting everything together:
USER
│
▼
┌───────────────┐
│ React App │
└───────┬───────┘
│
▼
┌───────────────┐
│ API Call │
└───────┬───────┘
│
┌─────────┴─────────┐
│ │
SUCCESS FAILURE
│ │
▼ ▼
Fresh API data IndexedDB
│ │
│ ▼
│ Cached data
│ │
└─────────┬─────────┘
│
▼
┌─────────────┐
│ React UI │
└─────────────┘
Meanwhile, the service worker handles application resources:
Browser Request
│
▼
Service Worker
│
├── Network available
│ ↓
│ Network response
│ ↓
│ Update cache
│
└── Network unavailable
↓
Cache response
This separation gives us a clean architecture.
When should you use this approach?
An offline-first PWA is particularly useful for applications such as:
- Analytics dashboards
- Admin dashboards
- Inventory applications
- Field-service applications
- Reporting tools
- Internal business applications
- Sales applications
- Warehouse applications
- Customer portals
- Project management tools
The common requirement is simple:
Users should still be able to see useful information even when the network isn’t available.
That’s where local persistence becomes extremely valuable.
Final thoughts
Building a PWA doesn’t require a completely different frontend architecture.
We can start with a normal React application and progressively add capabilities.
Our application began as:
React
+
REST API
Then we added:
React
+
REST API
+
IndexedDB
Then:
React
+
REST API
+
IndexedDB
+
Service Worker
And finally:
React
+
REST API
+
IndexedDB
+
Service Worker
+
Web App Manifest
The result is an application that can:
- Fetch fresh data when online
- Persist previously loaded data
- Display cached data when offline
- Cache application resources
- Be installed as a PWA
- Provide a more resilient user experience
The most important idea isn’t simply “make the application work offline.”
It is to decide which parts of the application should remain available offline and how stale data should be communicated to the user.
For a dashboard, a practical strategy is often:
Online
↓
Fetch fresh data
↓
Display it
↓
Persist it locally
Offline
↓
Read the last successful data
↓
Display it
↓
Tell the user when it was last updated
From there, you can evolve the architecture toward stale-while-revalidate, background synchronization, offline mutation queues, conflict resolution, and more sophisticated local data management.
That’s what makes the PWA approach powerful: you don’t have to build everything at once. You can progressively make an existing React application more resilient, more installable, and more useful in the real world.